Each barrel is taken apart and the good staves are saved. The damaged staves are used for smaller projects and our wine barrel smokin BBQ chips.
Six staves are chosen for each platter. Staves can vary in curvature, color, and thickness even within the same barrel. This makes every platter unique.
Each stave is sanded to get a flat surface. The red staining and texture is formed from years of making wine. This is the surface that was inside the barrel. The staves are positioned in a jig to get a rough idea of where they will sit once the platter is complete. ½ inch holes are then drilled part way through each stave.
The staves that make up the platter top are measured, then marked using a template.
The staves are screwed to the base and ready for cutting.
The platter is really coming together now. It is still screwed together at this point.
First the base pieces are removed, routed, sanded and stained. Then each of the pieces that make up the platter top is removed one by one.
Holes that will house a handle are being bored with a drill press.
Again, routing and sanding are done.
After sanding with a Dual Action sander with heavy grit, each piece is fine sanded by hand.
After the hand sanding, each piece one at a time is stained on the sides and bottom. This will allow full coverage as getting into the tight spaces after assembly is difficult.
Each piece is then wood glued and screwed back to the base for final assembly. Note that the tops of each stave are not stained at this time.
A hardwood dowel is cut into small pieces to be used to plug the holes in the platter.
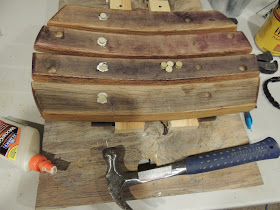
The wood plugs are then glued and hammered into place. The platter is allowed to sit overnight so the stain and wood glue dries completely.
The final sanding on the top surface is started with machine and finished by hand.
Staining really brings out the color! We wait about a day until the stain dries before applying the polyurethane.
We seal and finish the platter with a hand rubbed tung oil.
With 3 coats of the tung oil dry, its time to screw on the handles.
The platter is complete and ready to be enjoyed.


No comments:
Post a Comment